


最近想写一个音乐播放器作为安卓课程验收作业;于是拿起早些时候写的一个jayPlayer准备魔改一下,这个App使用的音乐资源来自Github上https://github.com/jsososo/MiguMusicApi用的是咪咕音乐的API,所以可以播放杰伦的歌。
书归正传,先看效果图
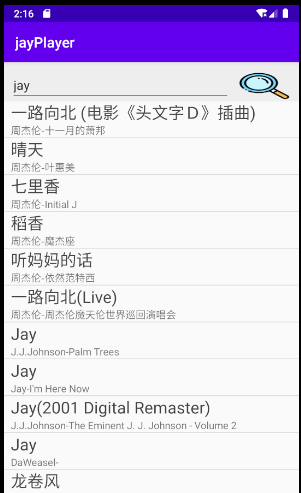
如图所示,每个搜索结果为一行大字和一行小字。其中大字是歌曲名;小字是歌手和专辑名。这种简单的两行显示其实安卓自身就有
android.R.layout.simple_list_item_2这个布局就是显示两个的。但是如果还要显示一张图片就不行了,由此引入本次主题,既然你能造这个我也能模仿造一个出来。
<ScrollView
            android:id="@+id/scrollView"
            app:layout_constraintTop_toBottomOf="@+id/grid"
            app:layout_constraintLeft_toLeftOf="parent"
            app:layout_constraintBottom_toBottomOf="parent"
            android:layout_width="match_parent"
            android:layout_height="match_parent"
            android:fillViewport="true"
            android:scrollbars="vertical">
                <ListView
                    android:id="@+id/listview"
                    android:layout_width="match_parent"
                    android:layout_height="match_parent"
                    />
        </ScrollView>
这是下方搜索结果的布局文件,其中我们定义了一个listview.
下面是重写适配器部分,先看一下用到的ShowItem类
package top.sencom.jayplayer.model;

import java.util.List;

public class ShowItem {
    private String name;
    private String albumName;
    private String artistName;

    public ShowItem(String name, String albumName, String artistName) {
        this.name = name;
        this.albumName = albumName;
        this.artistName = artistName;
    }

    public String getName() {
        return name;
    }

    public void setName(String name) {
        this.name = name;
    }

    public String getAlbumName() {
        return albumName;
    }

    public void setAlbumName(String albumName) {
        this.albumName = albumName;
    }

    public String getArtistName() {
        return artistName;
    }

    public void setArtistName(String artistName) {
        this.artistName = artistName;
    }

    @Override
    public String toString() {
        return  name + '\n' + albumName + '/' + artistName ;
    }
}
package top.sencom.jayplayer.adapter;
import android.content.Context;
import android.view.LayoutInflater;
import android.view.View;
import android.view.ViewGroup;
import android.widget.BaseAdapter;
import android.widget.TextView;
import java.util.List;
import top.sencom.jayplayer.R;
import top.sencom.jayplayer.model.ShowItem;
public class SearchResultAdapter extends BaseAdapter {
private List<ShowItem> data;
private LayoutInflater layoutInflater;
private Context context;
public SearchResultAdapter(Context context, List<ShowItem> data) {
this.context = context;
this.data = data;
this.layoutInflater = LayoutInflater.from(context);
}
public class Info{
public TextView fristLine;
public TextView secondLine;
}
@Override
public int getCount() {
return data.size();
}
@Override
public Object getItem(int position) {
return data.get(position);
}
@Override
public long getItemId(int position) {
return position;
}
@Override
public View getView(int position, View convertView, ViewGroup parent) {
Info info = new Info();
convertView = layoutInflater.inflate(R.layout.show_each_item, null);
info.fristLine = convertView.findViewById(R.id.first_line);
info.secondLine = convertView.findViewById(R.id.second_line);
info.fristLine.setText(data.get(position).getName());
info.secondLine.setText(data.get(position).getArtistName()+"-"+data.get(position).getAlbumName());
return convertView;
}
}上面自定义适配器核心代码就是getView方法的重写,大概过程就是从R.layout.show_each_item布局文件中加载View,然后为其中的控件赋值,最后返回这个自定义View。
下面是R.layout.show_each_item布局文件
<?xml version="1.0" encoding="utf-8"?>
<LinearLayout
    android:id="@+id/show_each_item"
    xmlns:android="http://schemas.android.com/apk/res/android" android:layout_width="match_parent"
    android:layout_height="match_parent">

    <GridLayout
        android:layout_width="match_parent"
        android:layout_height="wrap_content"
        android:orientation="vertical"
        android:rowCount="2">

        <TextView
            android:layout_marginLeft="10dp"
            android:id="@+id/first_line"
            android:layout_width="match_parent"
            android:textSize="23dp"
            android:text="SongName"
            android:textColor="#444"
            />
        <TextView
            android:layout_marginLeft="10dp"
            android:id="@+id/second_line"
            android:text="Arits-Album"
            android:layout_width="match_parent"/>
    </GridLayout>
</LinearLayout>
最后我们在Activity中编写如下代码
listView = findViewById(R.id.listview);
List<ShowItem> showItem = new ArrayList<ShowItem>();
// 赋值showItem
SearchResultAdapter searchResultAdapter = new SearchResultAdapter(MainActivity.this,showItem);
listView.setAdapter(searchResultAdapter);