


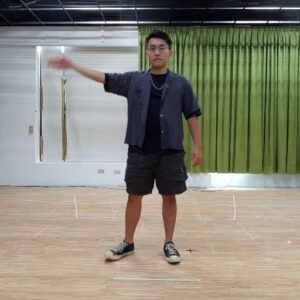
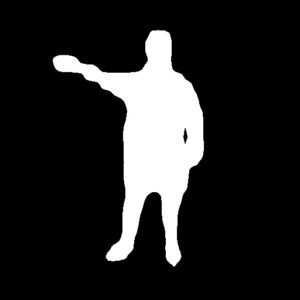
Mask-RCNN(https://arxiv.org/abs/1703.06870)基于COCO数据集做的物体分割,效果比较好。现在我需要对HuPR数据集中的图片进行处理,将人体从图像中分割出来做mask,效果如下图所示:
由于原始Mask R-CNN是基于tensorflow的,搭建比较麻烦,于是找到了mmdetection(https://github.com/open-mmlab/mmdetection)pytorch实现的各种检测合集里面都有,还有预训练好的模型可以直接使用,就非常NICE。
因为30系显卡仅能用CUDA11.0以上版本,所以,我是用如下命令安装:
conda create --name mmdet python=3.7
conda activate mmdet
pip3 install torch==1.8.2 torchvision==0.9.2 torchaudio==0.8.2 --extra-index-url https://download.pytorch.org/whl/lts/1.8/cu111
按照官方github上的教程安装mmcv:
pip install -U openmim
mim install mmcv-full
安装mmdet:
pip install mmdet预训练模型下载地址:
https://github.com/open-mmlab/mmdetection/blob/master/configs/mask_rcnn/README.md
这里我选择了X-101-32x8d-FPN版本。
将mmdetection的仓库git下来,然后再项目根目录新建一个py文件,写入如下内容,注意config位置和checkpoint位置,还有就是输入图像的位置,以及一张全黑的bg图片。
import os
from mmdet.apis import init_detector, inference_detector,show_result_pyplot
import numpy as np
import mmcv
import cv2

config_file = 'configs/mask_rcnn/mask_rcnn_x101_32x8d_fpn_1x_coco.py'
# 从 model zoo 下载 checkpoint 并放在 `checkpoints/` 文件下
checkpoint_file = 'checkpoints/mask_rcnn_x101_32x8d_fpn_1x_coco_20220630_173841-0aaf329e.pth'
device = 'cuda:0'
data_base_dir = '/home/jzm/code/HuPR_Dataset/frames'
# 初始化检测器
model = init_detector(config_file, checkpoint_file, device=device)
for dir_idx in range(1, 277):
    for img_idx in range(600):
        img = f'{data_base_dir}/single_{dir_idx}/{img_idx:09d}.jpg'
        print(f"{img}")
        bg = 'demo/bg.jpg'
        # 推理演示图像
        result = inference_detector(model, img)
        bg = cv2.imread(bg, cv2.IMREAD_COLOR)
        # 判断bbox和segm
        if isinstance(result, tuple):
            bbox_result, segm_result = result
        else:
            bbox_result, segm_result = result, None
        bboxes = np.vstack(bbox_result)

        if segm_result is not None:
            segms = mmcv.concat_list(segm_result)
            color_masks = [255,255,255]
            # 因为COCO中定义person为0位置,所以这里直接取0位置mask即可
            for x,y in np.argwhere(segms[0] == True):
                bg[x,y] = color_masks
        if not os.path.exists(os.path.join('mask_data',f'{dir_idx}')):
            os.mkdir(os.path.join('mask_data',f'{dir_idx}'))
        save_path = os.path.join('mask_data',f'{dir_idx}',f'{img_idx:09d}.jpg')
        cv2.imwrite(save_path, bg)
        # show the results
        # show_result_pyplot(model, bg, result)