上一次esp8266 的3D demo 没运行成功,
仔细一看代码写的还是挺有意思的 哈
尝试改一改 看看能否移植到 Windows 平台上!
底层绘图还是用 easyX 库 吧!
// 3D Demo
// 基于 espvgax/example/3D/3D.ino (https://github.com/smaffer/espvgax) 改写
// 平台 Windows 10 (Microsoft Visual Studio 2017)

#include <iostream>
#include <graphics.h>      // 引用图形库头文件
#include <conio.h>
#include <time.h>
#include <windows.h>


#define PCOUNT 8
#define WIDTH  640
#define HEIGHT 480

int cube2d[PCOUNT][2];

float cube3d[PCOUNT][3] = {
  { -0.5f, +0.5f, -0.5f },
  { +0.5f, +0.5f, -0.5f },
  { -0.5f, -0.5f, -0.5f },
  { +0.5f, -0.5f, -0.5f },
  { -0.5f, +0.5f, +0.5f },
  { +0.5f, +0.5f, +0.5f },
  { -0.5f, -0.5f, +0.5f },
  { +0.5f, -0.5f, +0.5f }
};
void zrotate(float v[3], float q, float rx, float ry) {
	float tx, ty, temp;
	tx = v[0] - rx;
	ty = v[1] - ry;
	temp = tx * cos(q) - ty * sin(q);
	ty = tx * sin(q) + ty * cos(q);
	tx = temp;
	v[0] = tx + rx;
	v[1] = ty + ry;
}
void yrotate(float v[3], float q, float rx, float rz) {
	float tx, tz, temp;
	tx = v[0] - rx;
	tz = v[2] - rz;
	temp = tz * cos(q) - tx * sin(q);
	tx = tz * sin(q) + tx * cos(q);
	tz = temp;
	v[0] = tx + rx;
	v[2] = tz + rz;
}
void xrotate(float v[3], float q, float ry, float rz) {
	float ty, tz, temp;
	ty = v[1] - ry;
	tz = v[2] - rz;
	temp = ty * cos(q) - tz * sin(q);
	tz = ty * sin(q) + tz * cos(q);
	ty = temp;
	v[1] = ty + ry;
	v[2] = tz + rz;
}
void draw_line(int p1, int p2) {
	line(cube2d[p1][0], cube2d[p1][1], cube2d[p2][0], cube2d[p2][1]);
}
void draw_cube(float cz, float a, float b, float c) {
	for (int i = 0; i < PCOUNT; i++) {
		float *v = cube3d[i];
		float tmp[3] = { v[0], v[1], v[2] };
		xrotate(tmp, a, 0, 0);
		yrotate(tmp, b, 0, 0);
		zrotate(tmp, c, 0, 0);
		float z = tmp[2] + cz;
		cube2d[i][0] = (int)((tmp[0] / z)* WIDTH + (WIDTH / 2));
		cube2d[i][1] = (int)((tmp[1] / z)* HEIGHT + (HEIGHT / 2));
	}
	draw_line(0, 1); draw_line(0, 2); draw_line(0, 4);
	draw_line(1, 5); draw_line(1, 3);
	draw_line(2, 6); draw_line(2, 3);
	draw_line(4, 6); draw_line(4, 5);
	draw_line(7, 6); draw_line(7, 3); draw_line(7, 5);
}
int main() {

	float a = 0, b = 0, c = 0;
	initgraph(640, 480);   // 创建绘图窗口,大小为 640x480 像素
	while (1) {
		setlinecolor(RED);
		draw_cube(2, c, 0, 0);
		setlinecolor(GREEN);
		draw_cube(4, b, c, a);
		setlinecolor(BLUE);
		draw_cube(9, c, a, b);
		Sleep(50);
		a += 0.1f;
		b += 0.01f;
		c += 0.002f;
		cleardevice();
	}
	_getch();              // 按任意键继续
	closegraph();          // 关闭绘图窗口
	return 0;
}
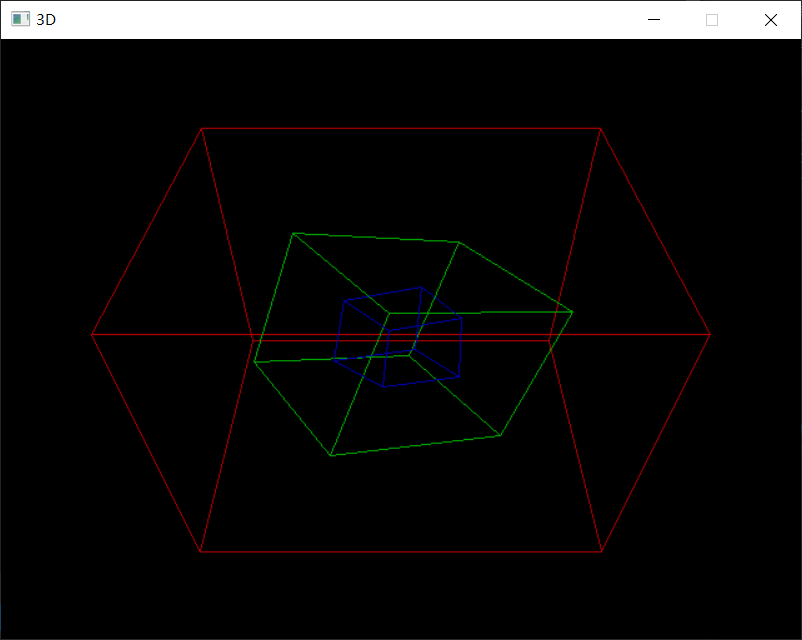
效果如下: